A Step-by-Step Guide to Building Foundations
For self-builders and extension builders, laying the foundations correctly is the key to preventing future structural issues.
When discussing in general it will the best to acquire professional help and let them handle the majority of the work when constructing a major foundation of a building. However some of the skilled people to build a new foundation of a small building by themselves if they are given proper guidance.
As the basic component of almost any construction project, a civil engineer must be familiar with the details of foundation construction. Understanding the phase of construction can help a homeowner to understand the building foundation construction process.
In order to make sure that the footings hold up the weight of a building, certain steps must be taken.
The Construction of Building Foundations: A Step-by-Step Guide
The building foundations of your house help to distribute the weight of your building, preventing the sub-soil from spreading out, as well as the foundations of your house from settling unevenly, which could cause structural problems for your house in the future.
In building foundations, the load is transmitted to the soil across a larger cross-section before being transferred to the structure. A foundation must withstand the load of the structure, including environmental factors and live loads.
A safety factor must be included when designing the foundation. This is accomplished through the construction of the foundation.
In this article, we will be listing the general steps you should follow during the building construction foundation.
1. Stake and Survey out the footprint
The surveyor will determine the correct distance from the property lines, usually by coming out to the site. That way the building will start off at the correct distance from the property line.
Stakes with surveyor's marks will mark the corners of the building. Following this, the surveyor places offset stakes about two feet apart from their stakes.
The offset stakes will serve as guides for digging for the foundation. Having an extra room will allow you to work on the outside foundation walls.
2. Excavation
After foundation work has been completed, the next step is excavation. It is important to conduct proper surveying on your land prior to obtaining a layout plan on the ground-based on the approved drawing.
In addition to marking all excavation lines, mark all pillars as well as centre lines of walls. The Contractor should excavate as much as is needed and according to levels, alignment, size, and shape.
All soil on the surface must be removed so the compacted soil beneath the building can be exposed.
The depth of the excavation will vary with each building. As a result, the top of the footing should be below the frost line to prevent cracks from occurring when the soil surrounding the building is frozen and thawed.
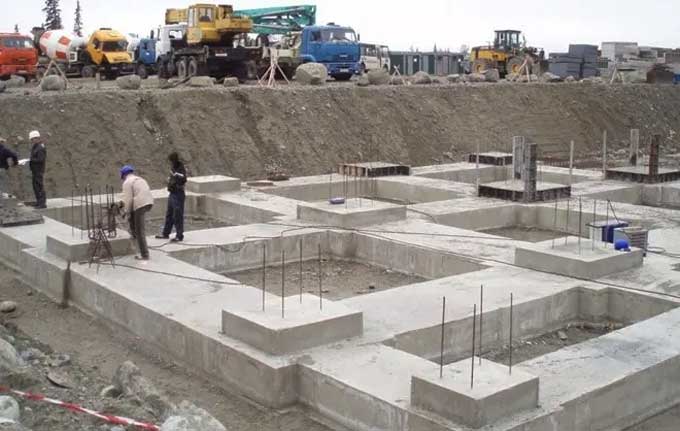
3. Footings
There are many kinds of footings, but the most common one is poured concrete that is used to spread weight from foundation walls to the soil.
Usually, the perimeter of the building is formed by walls that are wider than the foundation walls.
Additionally, load-bearing walls are sometimes supported with additional footings inside the perimeter.
4. Sub Slabs
It is common for plumbing lines to be run over or under the footings when connecting the street to the basement.
Even buildings with individual sewage facilities or drain fields face this issue. Normally, the lines are buried under a slab of concrete.
5. Drainage system of the foundation
This method prevents pools of water and flooding around the foundation by collecting and moving subsurface water.
Drainage tiles run along the perimeter of the building's foundation and are made of punched drainage pipes embedded in gravel.
To collect subsurface water, a sump pump may also be necessary for some regions.
6. Walls
Poured concrete is used for the foundation walls. In most cases, they are poured using sets of forms that support the fresh concrete alongside the appropriate bracing and hardware.
As soon as the concrete walls have reached their full strength, the formwork is removed. A structural engineer will determine the thickness of the foundation walls.
Based on the height of the wall and the load it must carry, the engineer will calculate the thickness of the wall.
7. Beam Pockets and Anchor Bolts
It is important that anchor bolts be used when framing foundation walls. Foundation walls are reinforced with anchor bolts embedded in concrete at predetermined locations.
Anchor bolt locations will have already been determined by the structural engineer prior to the walls being poured.
A beam pocket can also be found embedded in the top of the foundation walls. Among their functions are to hold beams in place, support them, and receive them.
8. Waterproofing
Waterproofing is one of the most simple yet one of the most important steps in a total construction process as it protects the building and its residents from any kind of harsh weather.
All foundation walls below grade are sealed with a waterproofing sealant. Thus, there was a space beyond the perimeter of the actual foundation when it was excavated. It prevents water from entering the basement of the building through the walls.
9. Slab
In between the foundation walls, a concrete slab of three to four inches thick is poured. By doing this, the base of the walls will be stabilized.
10. Backfilling of Soil
In the trenches around the foundation walls on the exterior, the backfill is pushed into the trenches once the waterproofing seal is dry.
In some cases, gravel is backfilled a third of the way, and then soil that drains well is placed on the backfill contributes to the stability of the foundation of a building foundation.